lördag, september 30, 2006

Modification of the Canister

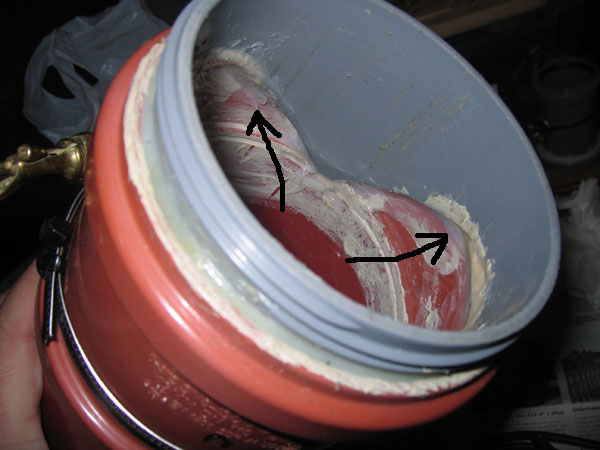
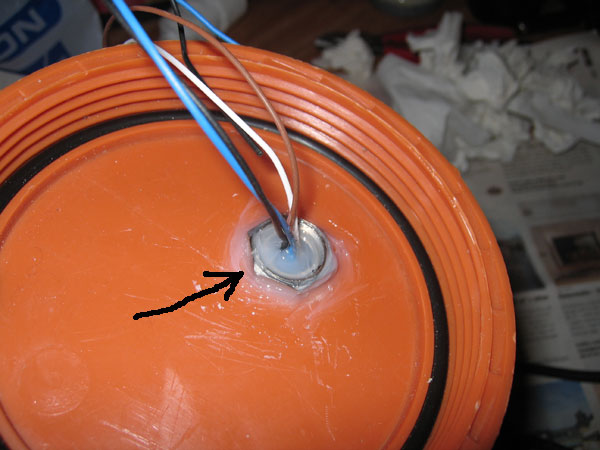
When I was looking for leakage of the canister I probably needed to seal at a bit more from the inside to make sure it was not leaking, on this image you can see where I added some more silicon inside the canister.


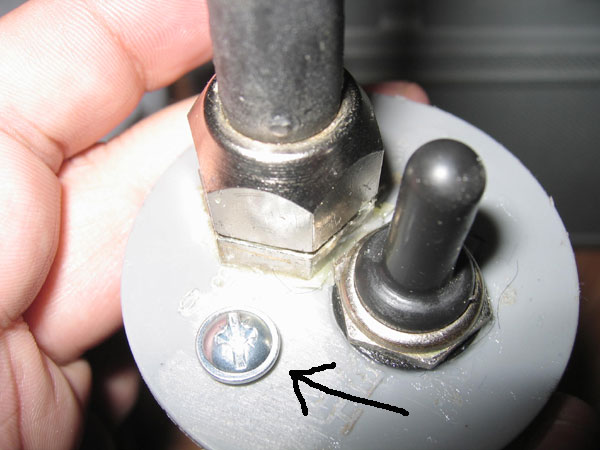
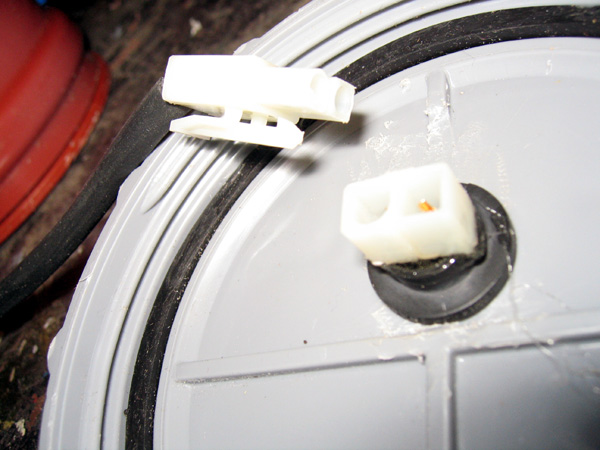
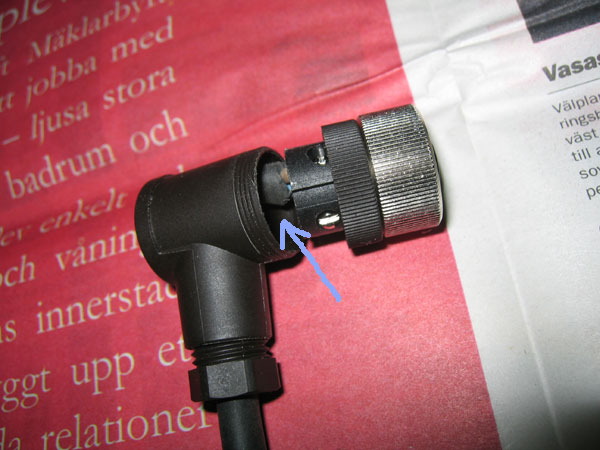
Here are the new contacts and teh blue arrow shows where I added silicon in the contact before I put it together, just to make sure it wasnt gonna let any water in through the contact.


On the inside of the lid the cords looks like this before I put them into the plastic contact.


To make sure that the contact is really NOT leaking I added some silicon on the inside of the lid too.


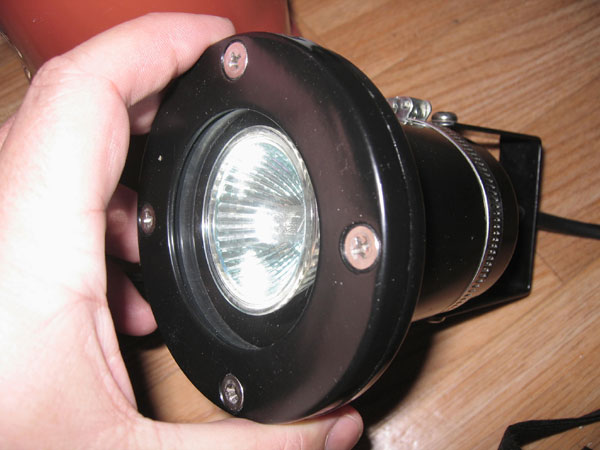
This is how the contact looks like put together and ready to be connected. As you can see the contact of the cord is with an 90 degrees angle which I think is really good to make it last much longer.


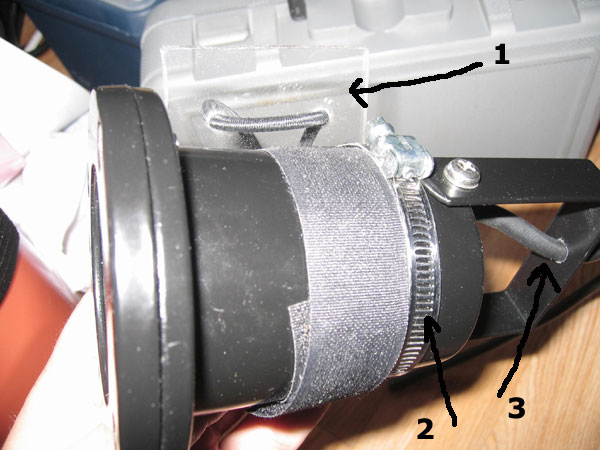
Another modification is this holder that are similar to the "buy-the-lamp-in-the-store" lamps. I just used 30 cm of soft webbing and strapped it really hard with the steal-strapps. It will be used if I want to put on my hip on my hip-webbing.


I also added another rubber-seal (o-ring) for the lid that hopefully will dothe trick.

So far I havent had the opportunity to try them out while diving but I have faith in them that these modifications will make it sealed.

Modification of the lamphead

Now it was time for the modification of the lamphead to take care of the problem with leakage and trouble with putting it together (it was so tight that the air needed to get out couldnt come out...).

Next picture shows the 3rd hole I drilled in the back of the lamp where the screw will be (the small hole at the top).


Inside of the back of the lamp where I have fixated a screwnut with superglue.


Here I have added more PL400 glue to keep the nut in place...


Added the switch and also plenty of silicon to make sure it is sealed.


At the arrow you can see the "air"-screw from the outside and it has an small rubberseal also.


This is how it looked like before the modifications...

New lamphead for the lamp...

As part of the search for a "perfect" homemade lamp I am also trying out a new lamphead from Jula company for a cost of 99 SEK. I did some modification of this lamphead to but that was more practical than anything else... ;)


This picture shows you the small add-ons for this lamphead:
2. Added this metal band to make it possible to use my homemade goodman-grip in plastic (nr 1 in the picture)
3. To be careful about the contact at the end of lamp I decided to keep the metal-hoop at the back of the lamp but I needed to make the hole bigger to fit the lamp-cord going through it.


This lamphead will have a on/off on the cord to the canister and I will show you that in the next couple of days... Its gonna be an homemade and simple as usual...

torsdag, augusti 10, 2006

Interesting.... ;)

I had a look at my statistics for this blog and I especially like to look into where people are coming from....


As you can see most people come from Sweden (>1000) but number 3 is different for me... Belgium, 11 visitors, not many but more than Norwegians... ;)

Just a thought....

It would be interesting to find out how you found your way here.... I guess many of you got here from www.dykarna.nu or www.sportdykare.se where I have been writing about this blog... but the rest of you guys??

Just write a comment and make me happy... :D

New contacts...

Becouse of the bad contacts in the canister I am looking for a good and cheap solution on that connection...

This is how it looked like before it broke:


At the moment this could be the solution:


I will try the second(2) and last one from left and seal it all both in and arround the contacts....

You can find these contacts here:

http://www.elfa.se/elfa-bin/dyndok.pl?dok=10114.htm

http://www.elfa.se/elfa-bin/dyndok.pl?lang=se&dok=2007174.htm

As soon I've got them and tried it I will post some photos and how it turned out...

söndag, maj 21, 2006

Photos from the first dive with the lamp

So here are the photos from my first dive with my new lamp on the wreck "Falken"...

This picture shows you how I easaly can clip on my lamp-head to the d-ring on my webbings...


The next picture show how I tempory added my battery-canister to my 10/300 dive-tank, when I get my new 2x7/232 tanks this canister will be connected on a similar way, hopefully it's gonna be with the old tank-belt for the single-tank (the one that is used to attach my 10/300 tank on this dive).


In the water, getting ready to do the dive...


A close up on the lamp-head that shows how good it fits to my hand...

måndag, maj 08, 2006

My costs... :(

So today I calculated the cost for building this lamp... People have asked me several times and I have told them it would probably be about 1100 SEK.... not to bad... BUT with all the costs it added up to (look at this image)


Yes thats right... 1759 SEK!!! Yes thats alot... But I could have used less expensive parts, probably if I bought them from other places... I didn´t spend to much time looking for it... Or if can "get" pipes and other parts for free from friends and family.

And if you remove the things I don´t need to buy for my next lamp (battery-charger, glue, silicon, silicon-tool) means 420 SEK less = 1339 SEK which is more the accurate price for the lamp...

The less expensive parts in this lamp would have been the things from www.elfa.se and maybe the parts from www.sublight.se, 2 places with some higer prices than avarage... Why pick them? Fast delivery and hard to find other shops in stockholm... I could probably replace some of the connectors for cheaper ones and get it 2-300 sheaper that 1339 SEK... ;)

Any suggestion for sheaper parts? Or other parts to a lamp like this? Post it in comments...

lördag, maj 06, 2006

First dive with the new lamp!!!!

So just a quick note on my first dive with my divelamp... I will get back to you with some photos from getting into to the water and how I was mounting the lamp onto my other gear.

For me this was a success, this lamp!!! Me and Jörgen went to the wreck Falken (
http://www.dykarna.nu/diveSpots/show.asp?dyk=20) at Kungsholmen/Fredhäll in Stockholm. For me it was the first dive for the season plus a bunch of new gear:
- My homemade divelamp
- New divecomputer
- New Harness, Backplate and Wing (Never used wing before this dive)
- 2 new regulators with long- and shorthose
- New Mask
- New manometre (?is it called that?)

The visability was about 1 meter and very dark down at the wreck so my lamp was really tested... not in depth but how it was ligting up in the dark of Mälaren and also if it might leak or not...

So how was the lamp?? Fantastic... :D Shining reall nice and bright, easy to handle (with the goodman-grip) and switch-on-off. But when I got up from the dive I realised 2 leaks... First one (Which I thought it might be) was the connection into the lid of canister.


So I will probably still use this contact but I will put glue on the inside in and arround the contact (next picture)


The next leak was in the lamp-housing, also the cable connector and I will fix that eaither with glue or silicon from the inside:


The leaks wasn´t that bad at all. The first one gave about ½ DL of water in the canister so it was no problem using it through-out the whole 35 min dive. The second one gave just some dampness in the lamphousing whish is not bad at all... but I need to fix it before I go any deeper than these 13 meters....

Next I will make a list of all the parts with the prices and where I bought them, that will just be an suggestion where to buy them.. If you find them cheaper somewhere else please post a comment or just mail me... That will also show how much I payd to build this very simple and good divelamp... ;) And photos of course mounted on my divegear.

torsdag, maj 04, 2006

Diskussions about the batteries... ;)

Thanks for commenting my blogg... One person pointed out in the battery part ([ Homemade Divelamp ]: Batteries) that the capacity of the battery found in the the pdf about the battery is changed depending on the amount of Amperes used.

As I understand this graph shows how many hours/minutes the battery will last depending on the Ampere load on it... I am not very good at this electricity thing but I have read this graph like this:

1. First I calculated how much my lamp would use in Ampere during 2 dives:


Here the mathematics again:
P = U * I (P = Watt[W], U = Volt[V], I = Ampere [A, Ampere per hour])

'U' is simple, 12 V is standard for the bulbs and contacts to use. The 'P' is 35 W (from the bulb), so to get the 'I' = P / U = 35 W / 12 V = 2.92 A is this bulb using per hour.

So for using this bulb (35 W) for 1½ hour and have at least 1/3 left you need an battery of: 2.92 A * 1½ = 4.38 A is the bulb using for 1½ hour of diving.

Adding 1/3 to that gives us: 4.38 + (4.38/3) = 5.84 A which means that you need a battery with at least 6 Ampere Hours
.

2. What batteries can I use that fits into an pipe with radius of 100 mm?

I found this cheap batteries from biltema that fullfilled my caclulation.

3. I had a look at the graph that I found in the specifikations of the batteries:


So when looking at this graph I looked how long the batteries would last with the 35W bulb using about 4.38 Amperes during 2 dives which for me looks like it will last for at least 1 hour (60 minutes) in the graph. Close enough for me... ;)


In the end of may I will go diving on the west coast of Sweden to finish of my Diveleader + 3 star (***) CMAS course and will probably use this lamp quite a lot. So we will see if the batteries last for 2 normal dives in Swedish water.... I will get back to you about this.. with photos and the story....

lördag, april 29, 2006

Day 4 constructing: Last assembling and "dry" testing...

So.. time for the last assembling of the lamp after letting everything dry for a few days....

First thing to do is to connect the battery inside the canister to the cable and then put the lid on to the canister... First and second picture.... You can aslo see tha lamp-head in these pictures...


Here I have made my own good-man-grip out of half a ice-scraper, red one (yes thats right... I got it from my car... :) which I made some holes in it, cable-collecting black wide strap from IKEA (the one that connects the red ice-scraper with the lamp) and then rubber-band to keep my hand attached to it... see. very simple... ;) and it works really good..


After that I turned it on and it was really shining.... :) But I just had it on for a few seconds at a time... It gets really warm out of the water... I even put the lamp-head in the zink filled with water to try if it was leaking or not and it seemed to work... Tha battery caninster is to big for me to test for leaking in my small 1-room flat... got no bath-tub.. :)


So this week-end coming up I will try it out while diving... It's gonna be really fun to see how it works.... If it keep water out and so on... I will get back with photos from my "virgin" dive with the lamp... :)

Wish me luck...